NOTE:
For Android Studio – use tapCLIQsdk.aar and integrate it in your app as shown below
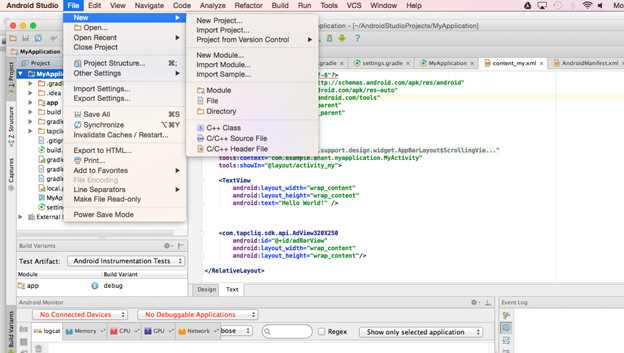
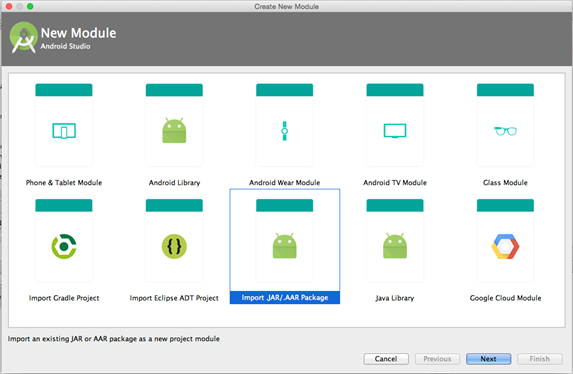
Step 1 : At the top level in project structure of your app – import .aar package as show in the screen shots below.
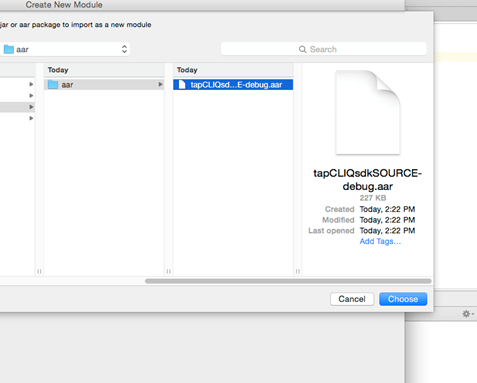
Step 2 : Select .aar package downloaded on your computer and click Finish. Package will be added to your app.
[Figure: 1 ]
[Figure: 2 ]
[Figure: 3 ]
Step 3 : Configure your Manifest file
// Used to download the ads
<uses-permission android:name="android.permission.INTERNET" />

// Necessary to check if the device is connected to a network
<uses-permission android:name="android.permission.READ_PHONE_STATE" />
<uses-permission android:name="android.permission.ACCESS_NETWORK_STATE" />

// Used for displaying maps and getting location based ads
<uses-permission android:name="android.permission.ACCESS_FINE_LOCATION" />
<uses-permission android:name="android.permission.ACCESS_COARSE_LOCATION" />
<activity
android:name="com.tapcliq.sdk.api.ActivityCFA"
android:theme="@android:style/Theme.Translucent.NoTitleBar"
android:noHistory="true">
</activity>
NOTE: If you application uses fullscreen attribute, change the theme to this:
android:theme="@android:style/Theme.Translucent.NoTitleBar.Fullscreen"
Step 4 : Add an Ad View to your layout file
<com.tapcliq.sdk.view.AdView
android:id="@+id/adBarView"
android:layout_width="wrap_content"
android:layout_height="wrap_content" />
com.tapcliq.sdk.api.AdView320X240
com.tapcliq.sdk.api.AdViewFullScreen
com.tapcliq.sdk.api.AdViewWidthX90
com.tapcliq.sdk.api.AdView320X250
Step 5 : Instantiate the Ad View in your activity
private AdView mAdBarView;
mWebAdView = (AdView) findViewById(R.id.webAdView);
mWebAdView.showNewAd("a7380cf91c5347b688ea351c5d78157q", "PU", "testandroid");
// 1st Parameter is App ID for your registered app,
// 2nd Parameter is "PU" for 720 x 300, "MR" for 300 x 250, "HP" for 300 x 600, "R" for 320 x 50
// 3rd Parameter is a string tag for which ads will be fetched (you can specify multiple tags by separating them with comma)
mWebAdView.setBackgroundColor(Color.TRANSPARENT);
mWebAdView.setVisibility(View.VISIBLE);
mAdBarView = (AdView320X50) findViewById(R.id.adBarView);
mAdBarView.showAd("Your App ID Goes Here", "Your Unit ID Goes Here");
mAdBarView = (AdView320X50) findViewById(R.id.adBarView);
mAdBarView.showAd("Your App ID Goes Here", "Your Unit ID Goes Here");
@Override
protected void onDestroy()
{
	mAdBarView.destroy();
	super.onDestroy();
}
Whenever you wish to display / request ad call showNewAd and set visibility:
mWebAdView.showNewAd("a7380cf91c5347b688ea351c5d78157q", "PU", "testandroid");
mWebAdView.setBackgroundColor(Color.TRANSPARENT);
mWebAdView.setVisibility(View.VISIBLE);
NOTE:
You do not need to do anything else if you just want to integrate ad unit. For push notifications and in-app message wall read futher
You can request tag based or moment specific ads. These tags are specified when creating a campaign in your tapcliq.com dashboard. Any ad that matches your tag will be displayed (you can have multiple). To do this you just have to call the following method:
mAdBarView.requestTagBasedAd("your tag");
Example:
Triggering an ad that matches the tag "coffee," would be done by passing the tag as follows:
mAdBarView.requestTagBasedAd("coffee");
If you want stop receiving the tag based ads, just pass in null:
mAdBarView.requestTagBasedAd(null);
Every answer your users give with a Question-Answer ad can be handled within your app. Listening to the answers your users give allows you to better adapt your app to what they want. When you create a Question-Answer ad, make sure you add a tag to each possible answer. This tag is what you will use to identify what answer your user gave. In order to listen to these answers, you must create an AdBarListener as shown below:
mAdBarView.setAdBarListener(newAdBarListener()
{
	@Override
	publicvoidonAnswerSelected(String answerTag)
	{
		//Handle answers here!
	}
	... More methods
})
Apart from listening to the answers your users give, the AdBarListener has various other events. Below is a list of all the current events that are available:
mAdBarView.setAdBarListener(new AdBarListener() {...});
| AdBarListener methods | Purpose |
|---|---|
| onNewAdPacketRequested() | Called when a new ad packet has been downloaded and ready to display |
| onAdBarDisplayed() | Called when the first ad is shown. This is when the ad view becomes visible |
| onAdBarRemoved() | Called when the ad view is removed and therefore not visible anymore. This is usually because there are no more ads to be displayed |
| onAdChange() | Called when a new ad is displayed |
| onCFAOpened() | Called when the user has interacted with the ad and therefore opened the call for action activity |
| onCFAClosed() | Called when the call for action activity has been closed |
| onAnswerSelected(String answerTag) | Called when the user has selected an answer to a Question-Answer ad (answerTag is the tag associated with the specific answer) |
| onEmptyPacket() | Called when there were no ads found. 1) There are either no ads linked with your app id. 2) There are no ads with the requested tag. 3) There is no network |
| onError(String error) | Called whenever there was an error retrieving the ad packet. The string error is the error returned by the server |
My Wall allows you to interact with your users in a more personal way. Users can send feedback, ask questions and view your replies. To open the users My Wall use the following static method:
MyWall.loadMyWall(activity,"Your App ID Goes Here");
Push notifications are a great way to easily notify all your users right away. In order to enable push notifications on your app add the following to your manifest file:
// Push notifications
<uses-permission android:name="android.permission.GET_ACCOUNTS"/>
<uses-permission android:name="android.permission.WAKE_LOCK"/>
<uses-permission android:name="com.google.android.c2dm.permission.RECEIVE"/>
<permission android:name="com.tapcliq.sdk.gcm.permission.C2D_MESSAGE" android:protectionLevel="signature"/>
<uses-permission android:name="com.tapcliq.sdk.gcm.permission.C2D_MESSAGE"/>
<application

<meta-data android:name="com.google.android.gms.version" android:value="@integer/google_play_services_version"/>

<receiver android:name="com.tapcliq.sdk.gcm.GcmBroadcastReceiver" android:permission="com.google.android.c2dm.permission.SEND">
<intent-filter>
<action android:name="com.google.android.c2dm.intent.RECEIVE"/>
<category android:name="com.tapcliq.sdk.gcm"/>
</intent-filter>
</receiver>

<service android:name="com.tapcliq.sdk.gcm.GcmIntentService"/>

</application>
Step1: Find the google_play_services library wherever you have your android sdk folder androidSdk/extras/google/google_play_services
Step2: Import it to your workspace File > Import > Android > Exiting Android Code into Workspace
Step3: Add the library to your app Right click on your project > select Properties > select Android on the left > at the bottom click on add and select google_play_services