Configure & create Push Notifications


To enable apple push notification in your app you need to -


  • Create a provisioning profile that is configured for push notification
  • SSL Certificate


There are 2 types of push server certificates:


  • Development:

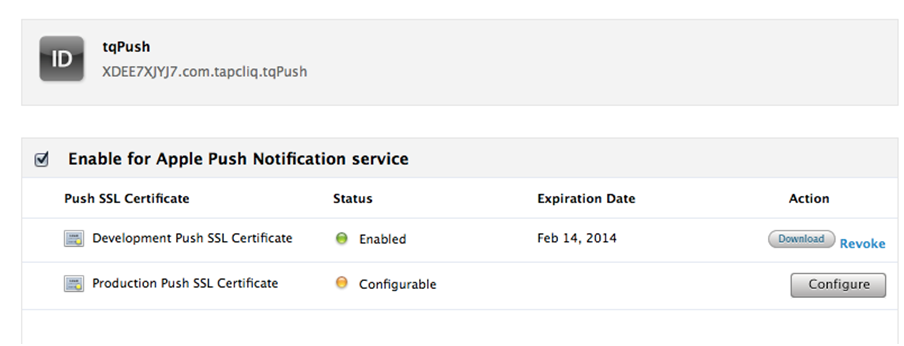
    If your app is running in Debug mode and is signed with the Development provisioning profile (Code Signing Identity is "iPhone Developer"), then your server must be using the Development certificate.

  •  
  • Production:

    Apps that are distributed as Ad Hoc or on the App Store (when Code Signing Identify is "iPhone Distribution") must talk to a server that uses the Production certificate.

    1. Create an App ID for your app (if you don't have one - note: this cannot be a wild card)
    2. Against the created App ID click on Configure.


    3. Under "Configure App ID check Enable for Apple Push Notification service". Click on Configure button for the Development Push SSL Certificate. The "Apple Push Notification service SSL Certificate Assistant" pops up. Follow the steps as shown in the screen shots and you'll have a valid development push SSL certificate for download.


    4. Install SSL APNS certificate in your keychain by double clicking on the downloaded APNS certificate. It would appear under "My Certificates".
    5. Save the certificate with it's key in .p12 format (Export certificate) and give it a password which you would use while uploading this certificate for push notification on tapcliq.com

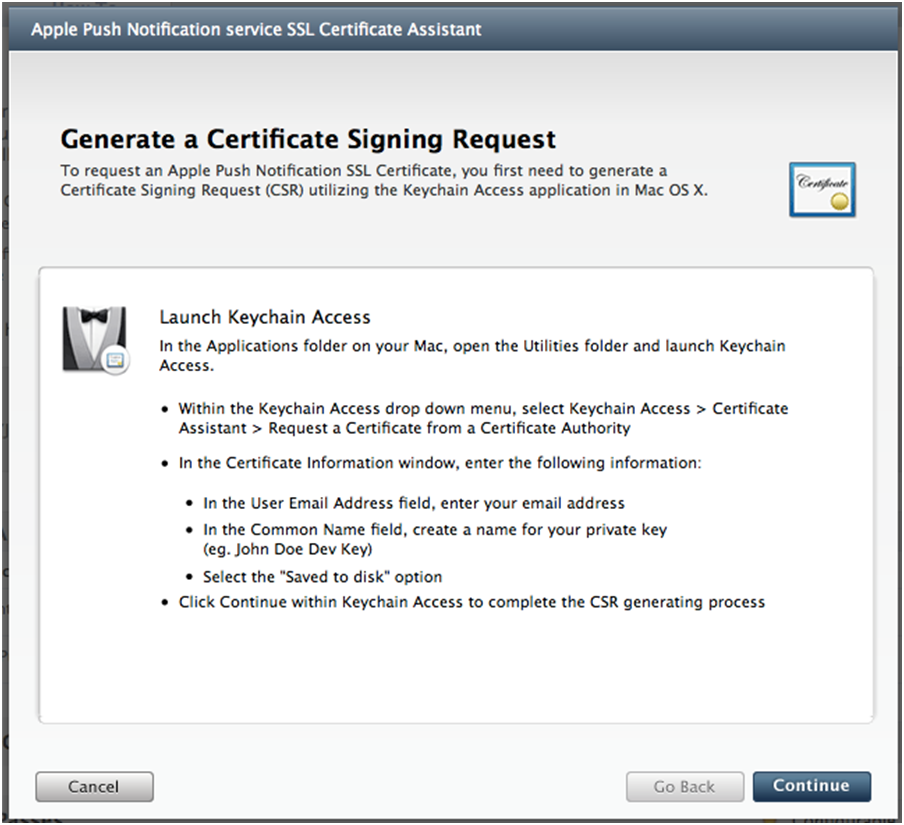
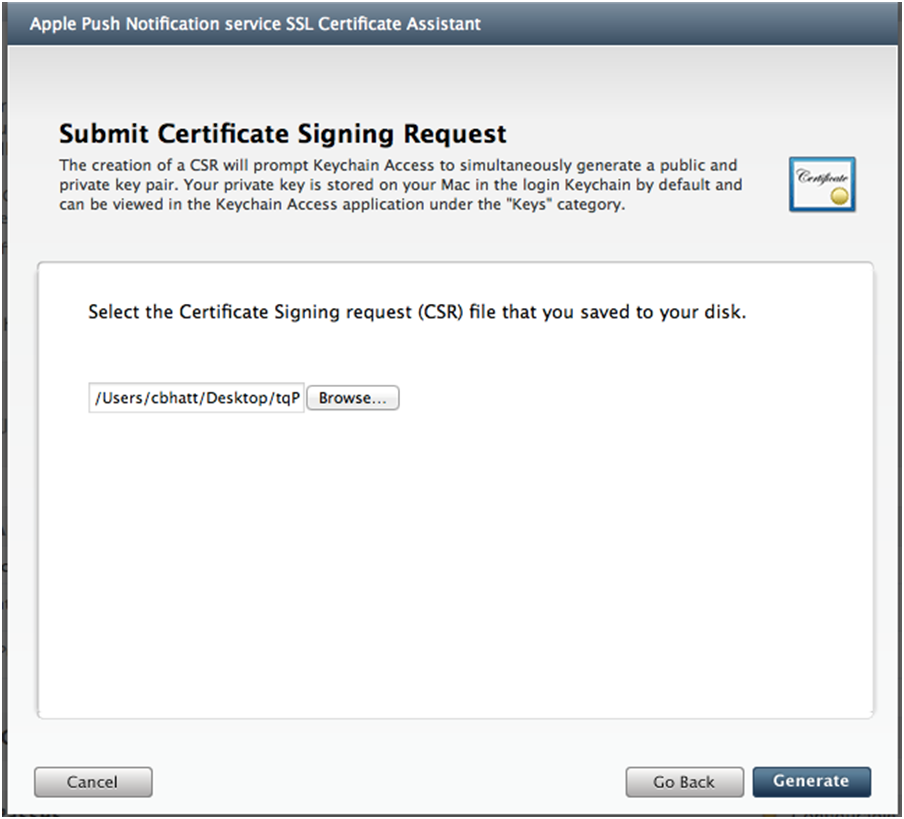
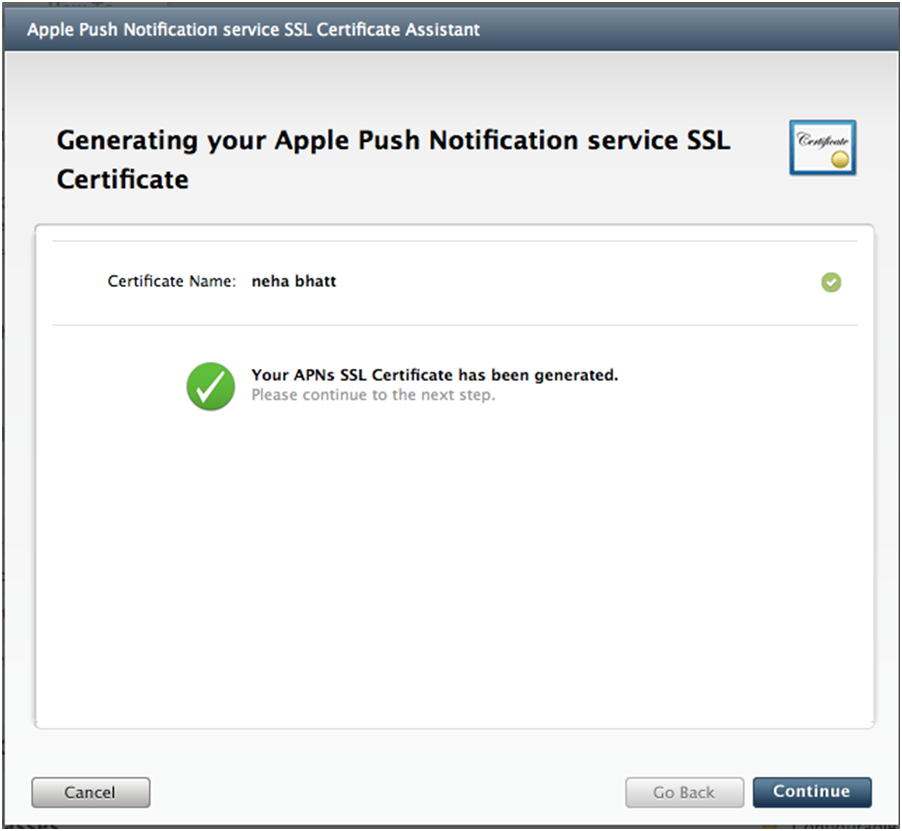
      NOTE: When you are ready to release your app, repeat this process for the production certificate. The steps are the same.


Create provisioning profile to run your app on device -


Whether you have created a new App ID or modified an existing one, you will need to regenerate your provisioning profile and install it. If you have trouble using an existing profile, try removing the App ID and setting it back. For this tutorial, we'll create a new one.

  1. Navigate to the Apple Developer Member Center website, and select Certificates, Identifiers & Profiles.
  2. Select Provisioning Profiles from the iOS Apps section.
  3. Select the + button to create a new iOS Provisioning Profile.
  4. Choose "iOS App Development" as your provisioning profile type then select "Continue". We will create Ad Hoc and App Store profiles later.
  5. Choose the App ID you created in Section 1 from the drop down then select "Continue".
  6. Select youriOS Development certificate in the next screen, then select "Continue".
  7. Select devices you want to include in the provisioning profile. Select "Continue" after selecting the devices you will be testing with.
  8. Choose a name for this provisioning profile, then select "Generate".
  9. Download the generated provisioning profile from the next screen by selecting the "Download" button.
  10. Install the profile by double-clicking on the downloaded file.

This should open Xcode's Organizer in the Devices pane. Your new provisioning profile should appear in the Provisioning Profiles section of your Library. Make sure that the status for this profile is "Valid profile".

NOTE: Prior to submitting your app to the App Store, you will need to test push notifications in production.


Configure your app on tapcliq.com to support push


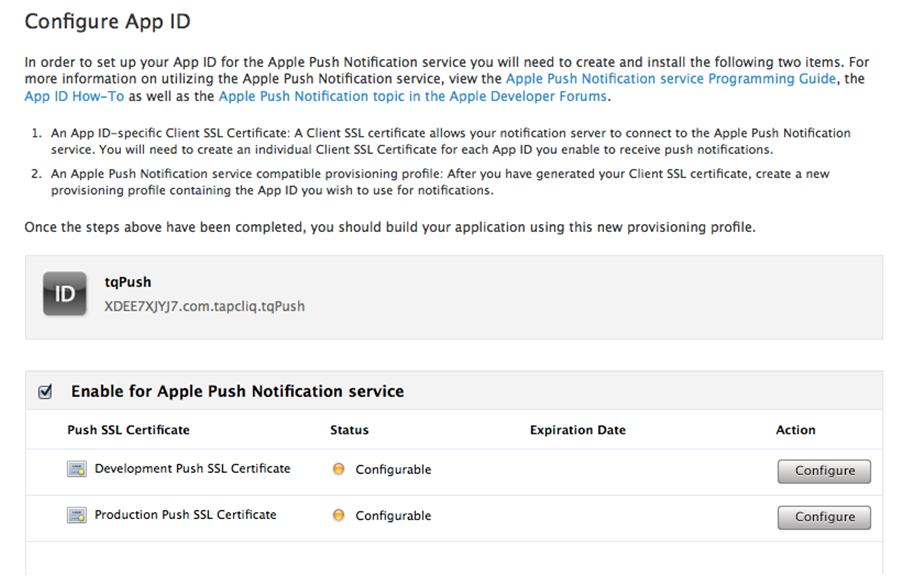
To enable push you'll haveto enable this feature for your app on tapcliq.com by choosing appropriate environment (Development Or Production) and uploading corresponding certificate.

  1. Log in to your account (on tapcliq.com) and navigate to your app under "My Apps".
  2. Click on Edit under options.
  3. Enable push notifications and choose the right environment - Development (if you are testing) and Production (if you are ready to release your app).
  4. Uploadrelevant (Development / Production SSL) .p12 certificate you exported from keychain and enter it's password (password with which it was saved)


Configure your iOS application for push


Let's start by configuring the Xcode project settings. Make sure that both the App ID and the provisioning profile are set.

  1. In the Info.plist file under the Supporting Files folder, modify the Bundle Identifier field to match your App ID's Bundle Identifier (ex. com.example.tQPushSampleApp).
  2. Select your project file in the left-hand menu. Under Project, navigate to "Build Settings", and find (or search for) the "Code Signing Identity" field.
  3. Set all values under this heading to match the provisioning profile installed earlier (ex. "tQPush Sample App Development Profile").
  4. On the left-hand side, select your project's name under "Targets". Again, navigate to "Build Settings" and find the "Code Signing Identity" field. Ensure that all values here also match the new provisioning profile.


Code additions to your app in order to support Push


  1. Register & handle push notificationsin the app delegate's [application: didFinishLaunchingWithOptions:] method as shown below


    - (BOOL)application:(UIApplication *)application didFinishLaunchingWithOptions:(NSDictionary *)launchOptions
    {
    ...
    
    	[applicationregisterForRemoteNotificationTypes:(UIRemoteNotificationTypeBadge | UIRemoteNotificationTypeSound | UIRemoteNotificationTypeAlert)];
    
    	NSDictionary *notification = [launchOptionsobjectForKey:UIApplicationLaunchOptionsRemoteNotificationKey];
    
    	[AdvBarhandlePushNotification:notification];
    ...
    }


  2. If registration is successful, the callback method [application:didRegisterForRemoteNotificationsWiithDeviceToken:] is executed. Set up the device for push notification by calling tapcliq’ssetPushDeviceToken:forAppId as shown below


    - (void)application:(UIApplication*)application didRegisterForRemoteNotificationsWithDeviceToken:(NSData*)deviceToken
    {
    	NSLog(@"My token is: %@", deviceToken);
    	
    	[AdvBarsetPushDeviceToken:deviceTokenforAppId:@"Your App Id"];
    }


  3. Handle push notification even when your app is open by adding below mentioned code -


    - (void)application:(UIApplication *)application didReceiveRemoteNotification:(NSDictionary *)userInfo 
    {
    	[AdvBarhandlePushNotification:userInfo];
    }


  4. In order to clear application badge added by push notification add the following code in [applicationDidBecomeActive:] method


    - (void)applicationDidBecomeActive:(UIApplication *)application
    {
    	application.applicationIconBadgeNumber = 0;
    	[[UIApplicationsharedApplication] cancelAllLocalNotifications];
    }


Sending push notifications from tapCLIQ web portal


  1. Log in to your account and navigate to Push Notifications (either by selecting it from left hand side panel OR by clicking on Push on your dashboard)
  2. Create push notification by: a)Entering message you wish to push, b) Selecting application in which to send push notification along with time at which it should be delivered. You can also associate an ad campaign that will be displayed when user opens your app in response to push notification.

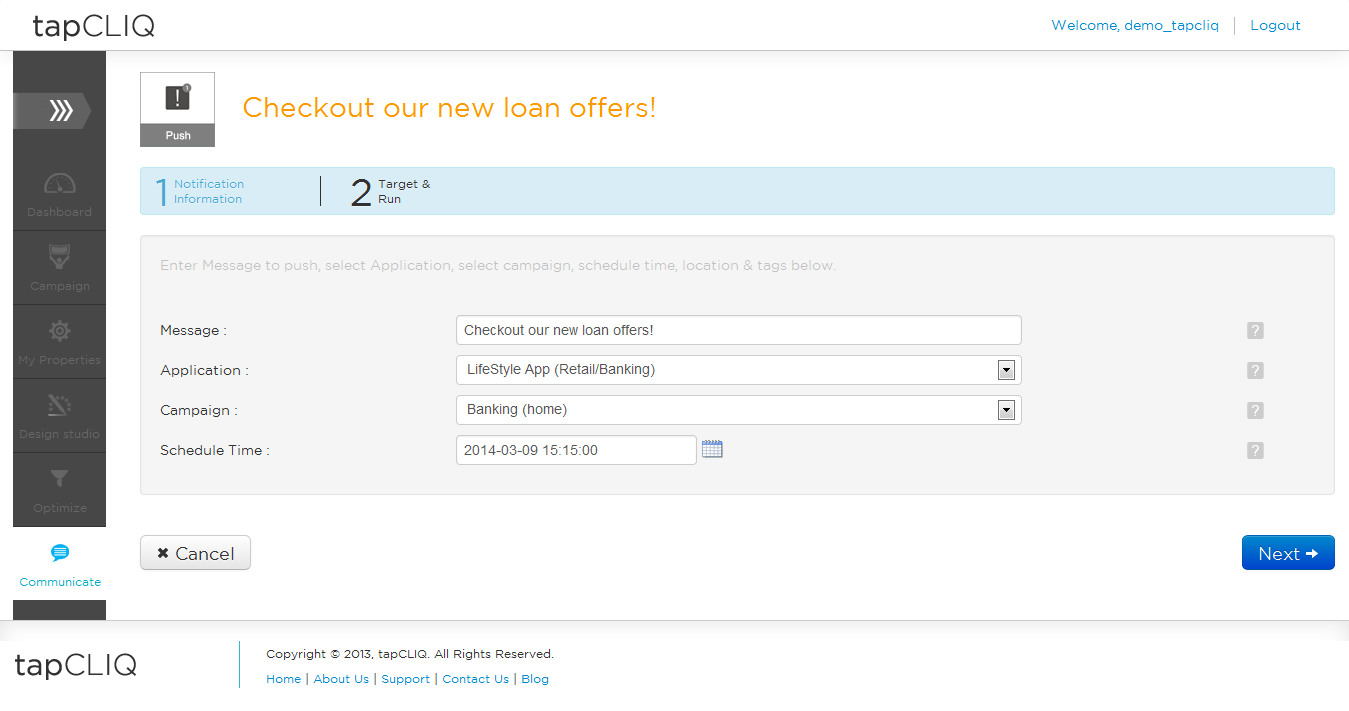
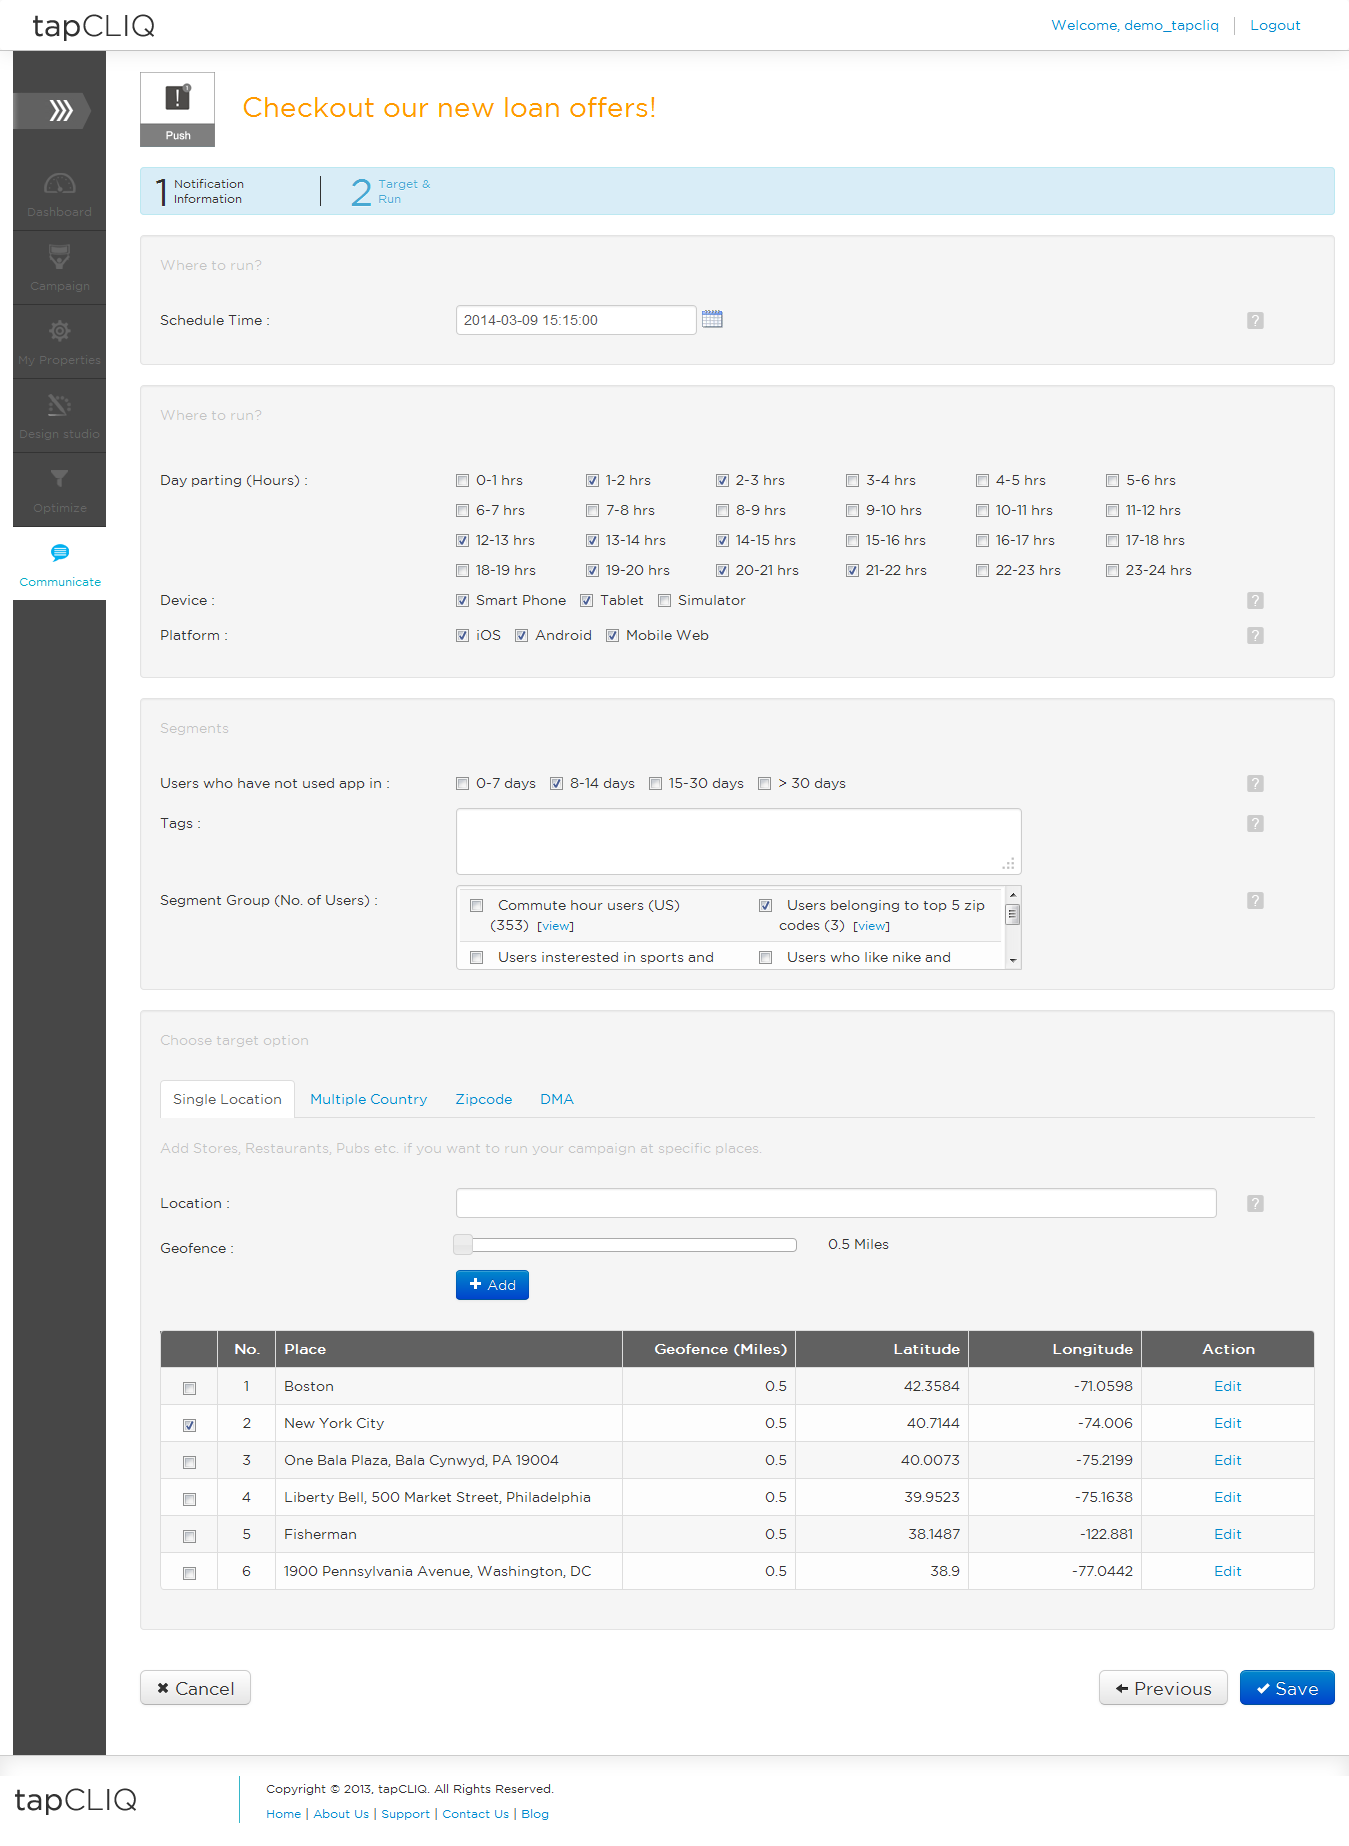
    NOTE: You can push your message to every user of your app or target specific segment of users by selecting appropriate segment under targeting.


Creating Push Notification


  1. Log in to your account and navigate to Push Notifications (either by selecting it from left hand side panel) and click on +Create Push Notification
  2. Notification Information:
    • Enter message you want to push.
    • Select application to which you wish to send push notification.

      Note: This application should be set up for push (Check out how to set up push for Android app in Android_README and for an iOS App in iOS_ConfigurePushNotification documents)

    • You can also assign your campaign that should be displayed when user open an app in response to push (optional)
    • Set the time at which push notification should be delivered


  3. Target & Run – Select target audience i.e., users to whom this notification should be sent.


Back to Top